基于Flask开发后端、VUE开发前端框架,在WEB端部署YOLOv5目标检测模型

Overview

1. 效果:

视频链接:

https://www.bilibili.com/video/BV1Wr4y1K7Sh

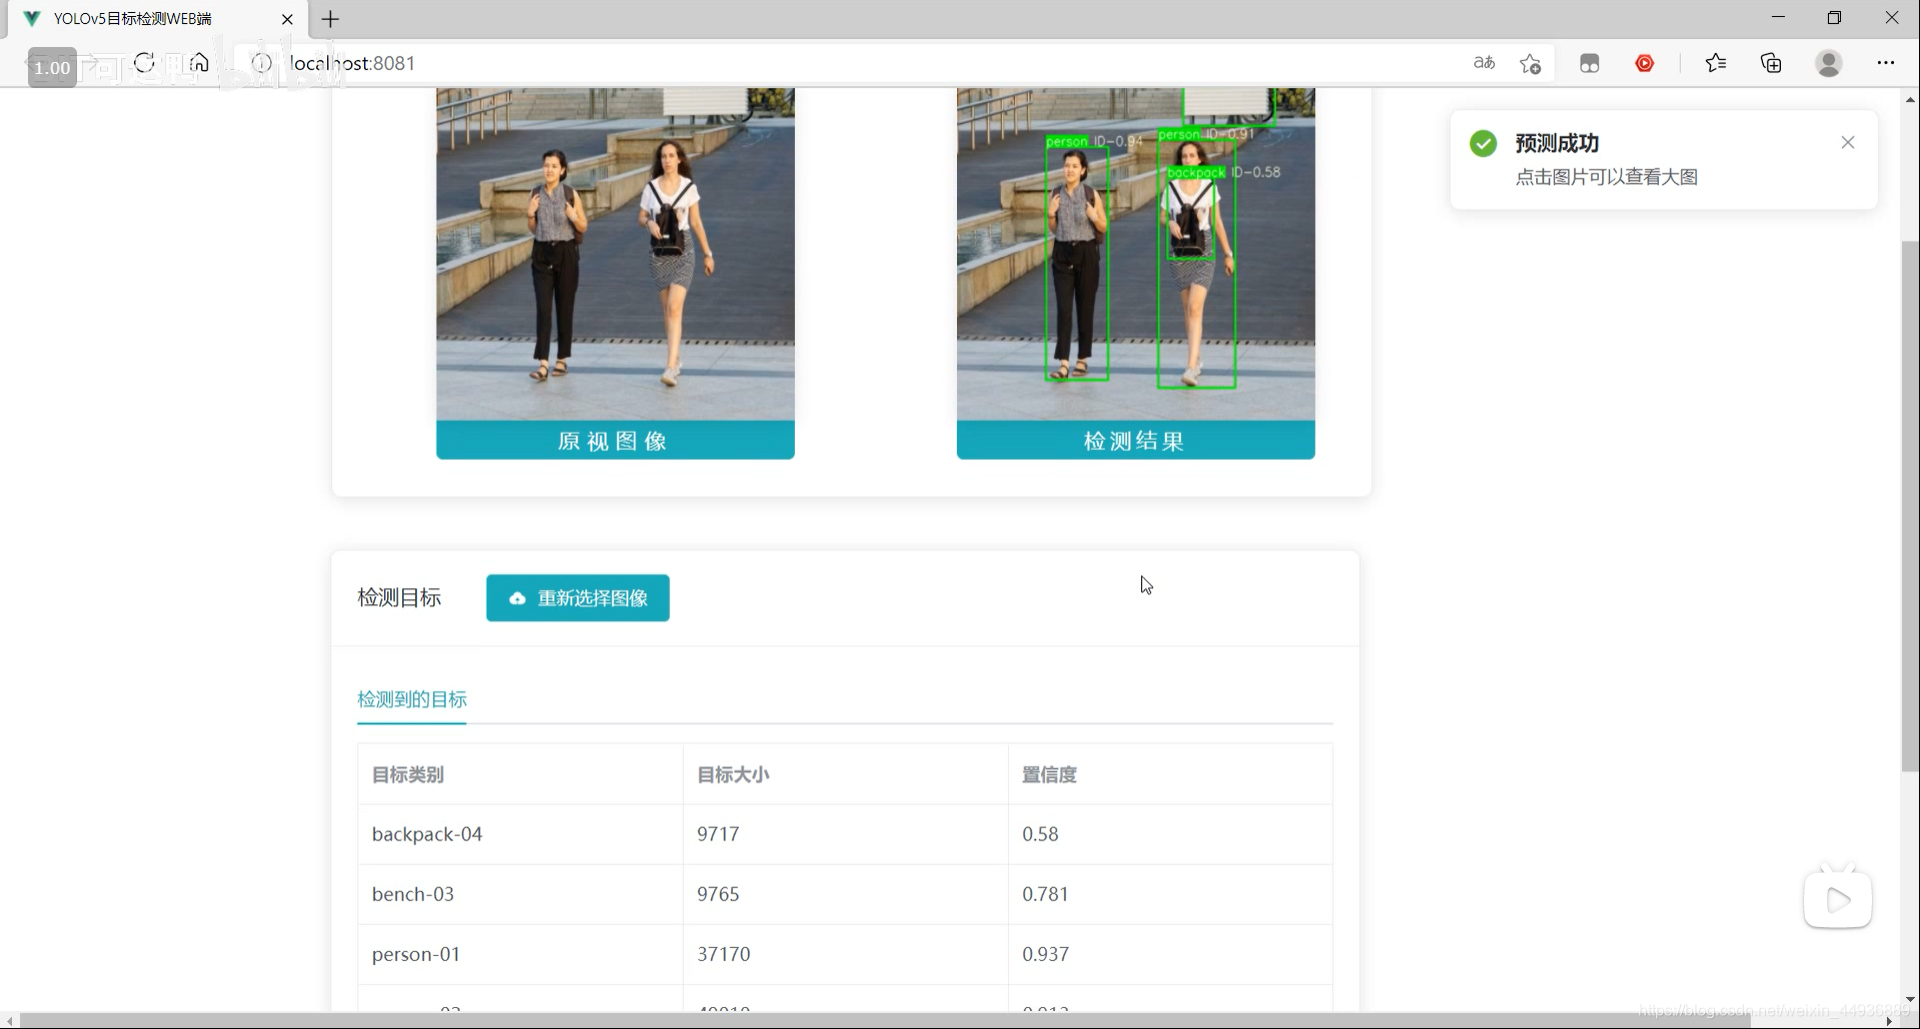
最终效果:

在这里插入图片描述

源码已经上传 Github:

https://github.com/Sharpiless/Yolov5-Flask-VUE

2. YOLOv5模型训练:

训练自己的数据集可以看我这篇博客:

【小白CV】手把手教你用YOLOv5训练自己的数据集(从Windows环境配置到模型部署)

这里演示的话我就用官方训练好的 yolov5m.pt 模型。

3. YOLOv5模型预测:

预测接口:

import torch
import numpy as np
from models.experimental import attempt_load
from utils.general import non_max_suppression, scale_coords, letterbox
from utils.torch_utils import select_device
import cv2
from random import randint


class Detector(object):

    def __init__(self):
        self.img_size = 640
        self.threshold = 0.4
        self.max_frame = 160
        self.init_model()

    def init_model(self):

        self.weights = 'weights/yolov5m.pt'
        self.device = '0' if torch.cuda.is_available() else 'cpu'
        self.device = select_device(self.device)
        model = attempt_load(self.weights, map_location=self.device)
        model.to(self.device).eval()
        model.half()
        # torch.save(model, 'test.pt')
        self.m = model
        self.names = model.module.names if hasattr(
            model, 'module') else model.names
        self.colors = [
            (randint(0, 255), randint(0, 255), randint(0, 255)) for _ in self.names
        ]

    def preprocess(self, img):

        img0 = img.copy()
        img = letterbox(img, new_shape=self.img_size)[0]
        img = img[:, :, ::-1].transpose(2, 0, 1)
        img = np.ascontiguousarray(img)
        img = torch.from_numpy(img).to(self.device)
        img = img.half()  # 半精度
        img /= 255.0  # 图像归一化
        if img.ndimension() == 3:
            img = img.unsqueeze(0)

        return img0, img

    def plot_bboxes(self, image, bboxes, line_thickness=None):
        tl = line_thickness or round(
            0.002 * (image.shape[0] + image.shape[1]) / 2) + 1  # line/font thickness
        for (x1, y1, x2, y2, cls_id, conf) in bboxes:
            color = self.colors[self.names.index(cls_id)]
            c1, c2 = (x1, y1), (x2, y2)
            cv2.rectangle(image, c1, c2, color,
                          thickness=tl, lineType=cv2.LINE_AA)
            tf = max(tl - 1, 1)  # font thickness
            t_size = cv2.getTextSize(
                cls_id, 0, fontScale=tl / 3, thickness=tf)[0]
            c2 = c1[0] + t_size[0], c1[1] - t_size[1] - 3
            cv2.rectangle(image, c1, c2, color, -1, cv2.LINE_AA)  # filled
            cv2.putText(image, '{} ID-{:.2f}'.format(cls_id, conf), (c1[0], c1[1] - 2), 0, tl / 3,
                        [225, 255, 255], thickness=tf, lineType=cv2.LINE_AA)
        return image

    def detect(self, im):

        im0, img = self.preprocess(im)

        pred = self.m(img, augment=False)[0]
        pred = pred.float()
        pred = non_max_suppression(pred, self.threshold, 0.3)

        pred_boxes = []
        image_info = {}
        count = 0
        for det in pred:
            if det is not None and len(det):
                det[:, :4] = scale_coords(
                    img.shape[2:], det[:, :4], im0.shape).round()

                for *x, conf, cls_id in det:
                    lbl = self.names[int(cls_id)]
                    x1, y1 = int(x[0]), int(x[1])
                    x2, y2 = int(x[2]), int(x[3])
                    pred_boxes.append(
                        (x1, y1, x2, y2, lbl, conf))
                    count += 1
                    key = '{}-{:02}'.format(lbl, count)
                    image_info[key] = ['{}×{}'.format(
                        x2-x1, y2-y1), np.round(float(conf), 3)]

        im = self.plot_bboxes(im, pred_boxes)
        return im, image_info

处理完保存到服务器本地临时的目录下:

import os

def pre_process(data_path):
    file_name = os.path.split(data_path)[1].split('.')[0]
    return data_path, file_name
import cv2

def predict(dataset, model, ext):
    global img_y
    x = dataset[0].replace('\\', '/')
    file_name = dataset[1]
    print(x)
    print(file_name)
    x = cv2.imread(x)
    img_y, image_info = model.detect(x)
    cv2.imwrite('./tmp/draw/{}.{}'.format(file_name, ext), img_y)
    return image_info
from core import process, predict


def c_main(path, model, ext):
    image_data = process.pre_process(path)
    image_info = predict.predict(image_data, model, ext)

    return image_data[1] + '.' + ext, image_info


if __name__ == '__main__':
    pass

4. Flask 部署:

然后通过Flask框架写相应函数:

@app.route('/upload', methods=['GET', 'POST'])
def upload_file():
    file = request.files['file']
    print(datetime.datetime.now(), file.filename)
    if file and allowed_file(file.filename):
        src_path = os.path.join(app.config['UPLOAD_FOLDER'], file.filename)
        file.save(src_path)
        shutil.copy(src_path, './tmp/ct')
        image_path = os.path.join('./tmp/ct', file.filename)
        pid, image_info = core.main.c_main(
            image_path, current_app.model, file.filename.rsplit('.', 1)[1])
        return jsonify({'status': 1,
                        'image_url': 'http://127.0.0.1:5003/tmp/ct/' + pid,
                        'draw_url': 'http://127.0.0.1:5003/tmp/draw/' + pid,
                        'image_info': image_info})

    return jsonify({'status': 0})

这样前端发出POST请求时,会对上传的图像进行处理。

5. VUE前端:

主要是通过VUE编写前端WEB框架。

核心前后端交互代码:

	// 上传文件
    update(e) {
      this.percentage = 0;
      this.dialogTableVisible = true;
      this.url_1 = "";
      this.url_2 = "";
      this.srcList = [];
      this.srcList1 = [];
      this.wait_return = "";
      this.wait_upload = "";
      this.feature_list = [];
      this.feat_list = [];
      this.fullscreenLoading = true;
      this.loading = true;
      this.showbutton = false;
      let file = e.target.files[0];
      this.url_1 = this.$options.methods.getObjectURL(file);
      let param = new FormData(); //创建form对象
      param.append("file", file, file.name); //通过append向form对象添加数据
      var timer = setInterval(() => {
        this.myFunc();
      }, 30);
      let config = {
        headers: { "Content-Type": "multipart/form-data" },
      }; //添加请求头
      axios
        .post(this.server_url + "/upload", param, config)
        .then((response) => {
          this.percentage = 100;
          clearInterval(timer);
          this.url_1 = response.data.image_url;
          this.srcList.push(this.url_1);
          this.url_2 = response.data.draw_url;
          this.srcList1.push(this.url_2);
          this.fullscreenLoading = false;
          this.loading = false;

          this.feat_list = Object.keys(response.data.image_info);

          for (var i = 0; i < this.feat_list.length; i++) {
            response.data.image_info[this.feat_list[i]][2] = this.feat_list[i];
            this.feature_list.push(response.data.image_info[this.feat_list[i]]);
          }

          this.feature_list.push(response.data.image_info);
          this.feature_list_1 = this.feature_list[0];
          this.dialogTableVisible = false;
          this.percentage = 0;
          this.notice1();
        });
    },

这段代码在点击提交图片时响应:

		<div slot="header" class="clearfix">
            <span>检测目标span>
            <el-button
              style="margin-left: 35px"
              v-show="!showbutton"
              type="primary"	
              icon="el-icon-upload"
              class="download_bt"
              v-on:click="true_upload2"
            >
              重新选择图像
              <input
                ref="upload2"
                style="display: none"
                name="file"
                type="file"
                @change="update"
              />
            el-button>
          div>

6. 启动项目:

在 Flask 后端项目下启动后端代码:

python app.py

在 VUE 前端项目下,先安装依赖:

npm install

然后运行前端:

npm run serve

然后在浏览器打开localhost即可:

在这里插入图片描述

关注我的公众号:

感兴趣的同学关注我的公众号——可达鸭的深度学习教程:

在这里插入图片描述

Owner
BIT可达鸭
基于tensorflow 2.x的图片识别工具集

Classification.tf2 基于tensorflow 2.x的图片识别工具集 功能 粗粒度场景图片分类 细粒度场景图片分类 其他场景图片分类 模型部署 tensorflow serving本地推理和docker部署 tensorRT onnx ... 数据集 https://hyper.a

Wei Qi 1 Nov 03, 2021
PyTorchCV: A PyTorch-Based Framework for Deep Learning in Computer Vision.

PyTorchCV: A PyTorch-Based Framework for Deep Learning in Computer Vision @misc{CV2018, author = {Donny You ( Donny You 40 Sep 14, 2022

FS-Mol: A Few-Shot Learning Dataset of Molecules

FS-Mol is A Few-Shot Learning Dataset of Molecules, containing molecular compounds with measurements of activity against a variety of protein targets. The dataset is presented with a model evaluation

Microsoft 114 Dec 15, 2022
Live training loss plot in Jupyter Notebook for Keras, PyTorch and others

livelossplot Don't train deep learning models blindfolded! Be impatient and look at each epoch of your training! (RECENT CHANGES, EXAMPLES IN COLAB, A

Piotr Migdał 1.2k Jan 08, 2023
Neural Message Passing for Computer Vision

Neural Message Passing for Quantum Chemistry Implementation of different models of Neural Networks on graphs as explained in the article proposed by G

Pau Riba 310 Nov 07, 2022
Iran Open Source Hackathon

Iran Open Source Hackathon is an open-source hackathon (duh) with the aim of encouraging participation in open-source contribution amongst Iranian dev

OSS Hackathon 121 Dec 25, 2022
[CVPR 2021] Pytorch implementation of Hijack-GAN: Unintended-Use of Pretrained, Black-Box GANs

Hijack-GAN: Unintended-Use of Pretrained, Black-Box GANs In this work, we propose a framework HijackGAN, which enables non-linear latent space travers

Hui-Po Wang 46 Sep 05, 2022
ZeroVL - The official implementation of ZeroVL

This repository contains source code necessary to reproduce the results presente

31 Nov 04, 2022
An index of algorithms for learning causality with data

awesome-causality-algorithms An index of algorithms for learning causality with data. Please cite our survey paper if this index is helpful. @article{

Ruocheng Guo 2.3k Jan 08, 2023
Self-Supervised CNN-GCN Autoencoder

GCNDepth Self-Supervised CNN-GCN Autoencoder GCNDepth: Self-supervised monocular depth estimation based on graph convolutional network To be published

53 Dec 14, 2022
LogDeep is an open source deeplearning-based log analysis toolkit for automated anomaly detection.

LogDeep is an open source deeplearning-based log analysis toolkit for automated anomaly detection.

donglee 279 Dec 13, 2022
Implementation of CrossViT: Cross-Attention Multi-Scale Vision Transformer for Image Classification

CrossViT : Cross-Attention Multi-Scale Vision Transformer for Image Classification This is an unofficial PyTorch implementation of CrossViT: Cross-Att

Rishikesh (ऋषिकेश) 103 Nov 25, 2022
Codebase for arXiv preprint "NeRF++: Analyzing and Improving Neural Radiance Fields"

NeRF++ Codebase for arXiv preprint "NeRF++: Analyzing and Improving Neural Radiance Fields" Work with 360 capture of large-scale unbounded scenes. Sup

Kai Zhang 722 Dec 28, 2022
Styled Handwritten Text Generation with Transformers (ICCV 21)

⚡ Handwriting Transformers [PDF] Ankan Kumar Bhunia, Salman Khan, Hisham Cholakkal, Rao Muhammad Anwer, Fahad Shahbaz Khan & Mubarak Shah Abstract: We

Ankan Kumar Bhunia 85 Dec 22, 2022
Backend code to use MCPI's python API to make infinite worlds with custom generation

inf-mcpi Backend code to use MCPI's python API to make infinite worlds with custom generation Does not save player-placed blocks! Generation is still

5 Oct 04, 2022
Code for "Adversarial Training for a Hybrid Approach to Aspect-Based Sentiment Analysis

HAABSAStar Code for "Adversarial Training for a Hybrid Approach to Aspect-Based Sentiment Analysis". This project builds on the code from https://gith

1 Sep 14, 2020
deep learning model with only python and numpy with test accuracy 99 % on mnist dataset and different optimization choices

deep_nn_model_with_only_python_100%_test_accuracy deep learning model with only python and numpy with test accuracy 99 % on mnist dataset and differen

0 Aug 28, 2022
CVPR2021: Temporal Context Aggregation Network for Temporal Action Proposal Refinement

Temporal Context Aggregation Network - Pytorch This repo holds the pytorch-version codes of paper: "Temporal Context Aggregation Network for Temporal

Zhiwu Qing 63 Sep 27, 2022
DeepMetaHandles: Learning Deformation Meta-Handles of 3D Meshes with Biharmonic Coordinates

DeepMetaHandles (CVPR2021 Oral) [paper] [animations] DeepMetaHandles is a shape deformation technique. It learns a set of meta-handles for each given

Liu Minghua 73 Dec 15, 2022
[v1 (ISBI'21) + v2] MedMNIST: A Large-Scale Lightweight Benchmark for 2D and 3D Biomedical Image Classification

MedMNIST Project (Website) | Dataset (Zenodo) | Paper (arXiv) | MedMNIST v1 (ISBI'21) Jiancheng Yang, Rui Shi, Donglai Wei, Zequan Liu, Lin Zhao, Bili

683 Dec 28, 2022